Tuesday, March 17, 2015


Over Christmas we demo'd some walls to make an opening for new columns for our staircase.  Well, after finishing the wood upstairs, painting the stairway, and painting the upstairs and entry, we finally are making progress on the columns.


We drew up some plans, and went to work covering the two by fours with MDF and backerboard.  Both products paint up nicely.


We measured how big we want the recessed panel to be, and ripped some MDF strips on the table saw. We brought them in, put them together, and then nailed them when we were happy with how the seams looked.


We decided to build out the bottom with wainscoting and leave the top plain.  I liked the way it still kept the entry open, but adds a lot of character and detail.  I need to fill the holes in with spackle, we need to caulk, then I can paint them a lovely shade of white.


We are also busy putting the backer board up for the rest of the wainscoting on the main level.  It is a lot of work, but it is also  fun watching it come together. Pin It

Monday, March 16, 2015

My fun clock project

About twelve years ago my hubby built me a clock for Christmas. I love this clock, and have been looking for the perfect place to put it in our home.  After we got the wood done in the upstairs hall, we decided the natural spot for the clock would be in the hall.  I was so excited, the only problem was the paint color.


The color that I had painted it matched the rooms in our old home, not this one.  I am keeping the hallway pretty neutral, just black and white photos, even the chair in the landing is black and white. I knew I wanted a pop of color.  You can see the clock from the downstairs entry so I needed it to also match the colors I am painting in my downstairs rooms.  I decided on my favorite butter yellow color.  I had a can outside in my paint cabinet, so I could paint the clock for free!  I took the door off, all the hinges, and the clock face out of the front.  I painted the mat around the clock face a dark gray color to match the yellow and walls better. By the way...painting picture mat is super easy and totally works!


It turned out great, it was an easy project to do, and with just a little more accessorizing it will be ready to go! Pin It

Tuesday, March 10, 2015

Wood


We have finished installing the wood upstairs. It looks amazing, and I am excited! Everywhere except the bedrooms has wood floor and it opens up the space making it feel warm and spacious. I chose a engineered acacia wood floor. I love the dark floors and light walls.


It has been a lot of work...especially for my husband...but I am loving the results! Pin It

Monday, March 2, 2015

How I re finished my stair railings

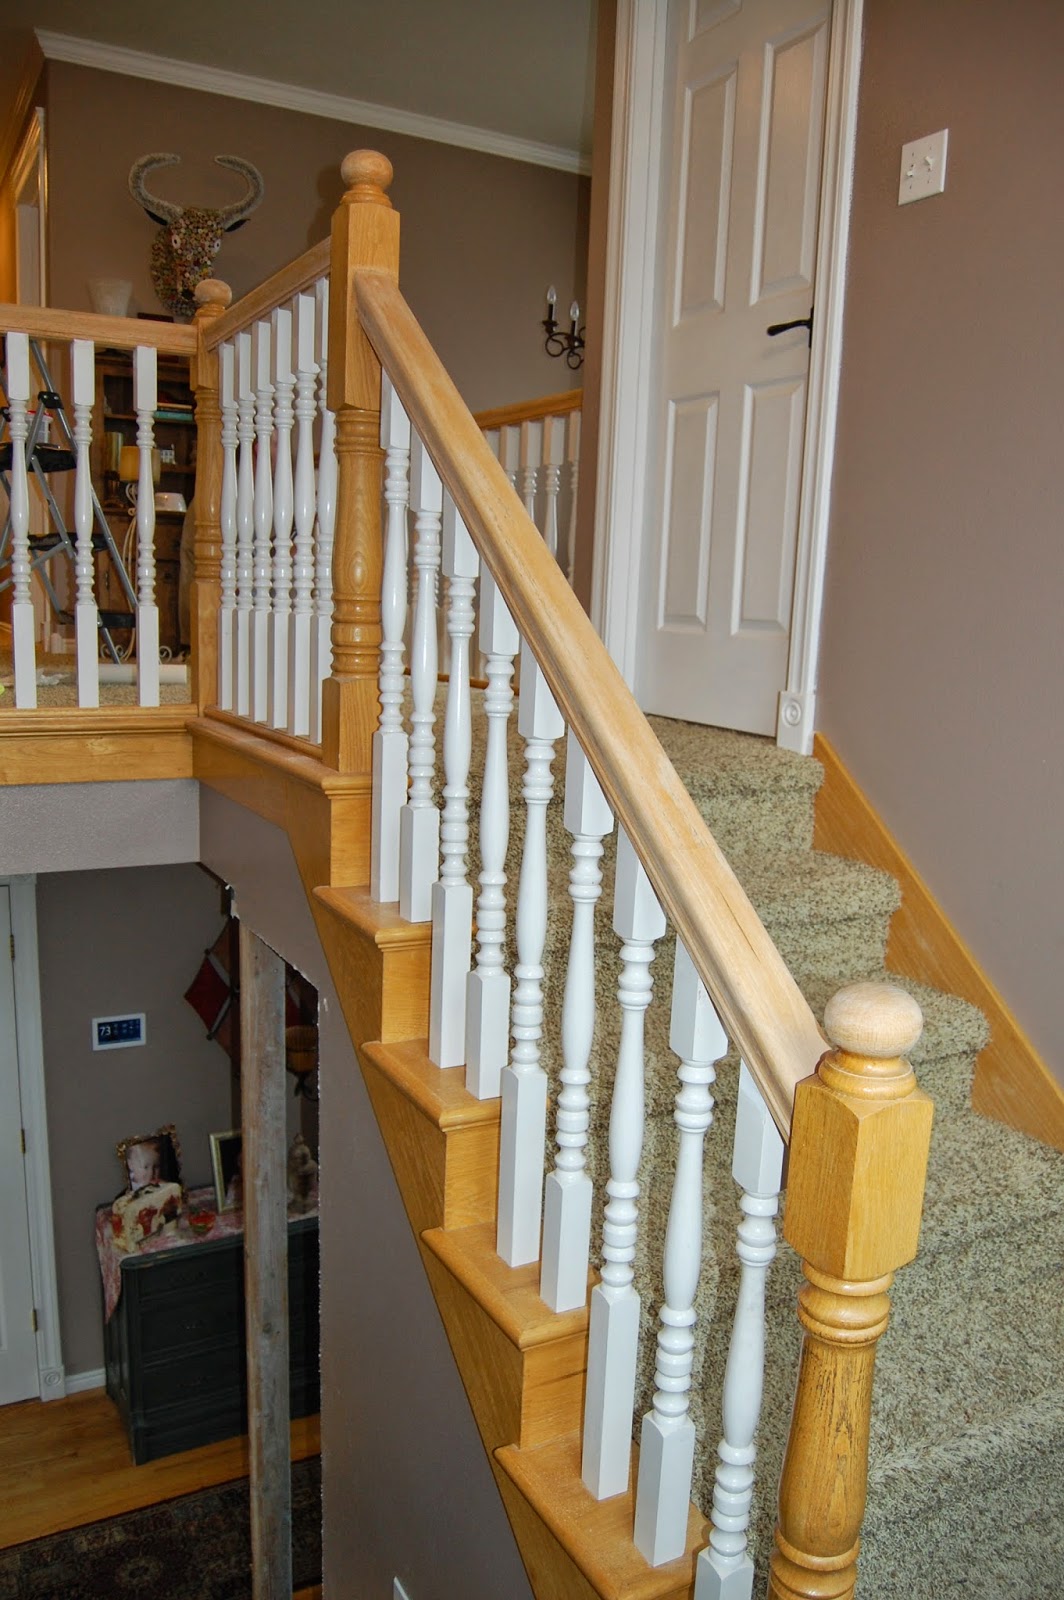
We've been busy around here lately. After we got the downstairs wall demo'd we started working on the stair railings. I knew the look I wanted, and knew it would take a lot of work. The original railings were a light oak and white. We are putting a dark acacia wood on the floor, so I wanted the top of my railings to match.  We decided that instead of just painting the whole railing, we would try stripping off the varnish and stain and try re staining the wood. We used a citris stripper we found at Home Depot.
WM Barr 73803 CITRISTRIP® Paint & Varnish Stripping Gel - 1/2 Gallon
We painted it on the wood top, waited the recommended time, and scraped the finish right off. It took a lot of elbow grease, but it worked great.
Here is a picture of the stripped wood. Between the citristrip and a lot of sanding, everything came off and the wood was ready to stain. I only stripped the hand rail. We decided to paint the rest white.
Here's how it looks after we got the darker stain on it. I used a minwax stain and finished it with a rub on semi gloss polyurethane. That was the easiest part of the project. Next I got to work painting everything else.
I just painted everything else with my ultra pure white wall trim I use on all the trim in my house. I did do a first coat of zinsser primer just to guarantee the paint stayed on and did not chip. All in all with the primer, the railings got three coats of paint.


It was a lot of work, but so worth it.  I love how just by staining and painting, the railings got such a great update. Pin It

Monday, January 19, 2015

Some more demo

Yep it wouldn't be home around here without a little demo. Over the Christmas break we spent a day taking out part of a wall. It was a milestone for us...it was on the main level...the last level to finish. I did not think we would ever get to this point. So it has started and I am so very excited to show our little demo project...the start of my vision for the main living space.


I really hated how the walls closed in the stairs, and that I couldn't see the stairs from the front door. We decided to fix that by tearing out a section of the wall on both sides to open up the space to make it feel more open. It totally did the trick.  We are going to build columns on both sides and add some banisters to match what we have upstairs.  I am so excited to see how it comes together. Pin It

Friday, January 16, 2015

Flash back Friday

As I was finishing up my room project I started thinking of all the other rooms I have created in the past which led me to look up some old pictures of my other master bedroom and bathroom.


It is so funny how styles change and you change along with them. I use to love dark jewel tone colors, and black painted furniture. It was pretty, but I love the light colors I am using now. They are so much more calming to my personality.  That is why I love decorating. It is a constant evolution of change and creativity. Nothing has to stay the same forever, and you can express the way you feel in the rooms you create. It was fun looking back remembering all the work we did and the things we created  in that room, and how much we enjoyed that space. Pin It

Thursday, January 15, 2015

Another painting project

I did a lot of painting in my bedroom. One of my favorite pieces that I painted was actually my bed side table or cabinet.
I can't believe I didn't take a before picture. I was in such a hurry to get my room done, I just grabbed a paint brush and went to work. This piece use to be black everywhere. It even had black wooden knobs.  I painted it the same white as the fireplace and trim with my satin trim paint. I took an electric sander and distressed the heck out of it.  I found these great knobs in Shelley and was actually going to use them on my book shelf. When I held them up to it, I knew that they were perfect. We weren't sure if we were going to use this old piece or find something new, but after I painted it and put on the knobs I knew it was just right for this space. This dresser actually took me only a couple of hours, but it gave great impact to this room and I love it! Pin It