About twelve years ago my hubby built me a clock for Christmas. I love this clock, and have been looking for the perfect place to put it in our home. After we got the wood done in the upstairs hall, we decided the natural spot for the clock would be in the hall. I was so excited, the only problem was the paint color.
The color that I had painted it matched the rooms in our old home, not this one. I am keeping the hallway pretty neutral, just black and white photos, even the chair in the landing is black and white. I knew I wanted a pop of color. You can see the clock from the downstairs entry so I needed it to also match the colors I am painting in my downstairs rooms. I decided on my favorite butter yellow color. I had a can outside in my paint cabinet, so I could paint the clock for free! I took the door off, all the hinges, and the clock face out of the front. I painted the mat around the clock face a dark gray color to match the yellow and walls better. By the way...painting picture mat is super easy and totally works!
It turned out great, it was an easy project to do, and with just a little more accessorizing it will be ready to go!
Pin It
Showing posts with label re-purposed furniture. Show all posts
Monday, March 16, 2015
Thursday, January 15, 2015
Another painting project
I did a lot of painting in my bedroom. One of my favorite pieces that I painted was actually my bed side table or cabinet.
I can't believe I didn't take a before picture. I was in such a hurry to get my room done, I just grabbed a paint brush and went to work. This piece use to be black everywhere. It even had black wooden knobs. I painted it the same white as the fireplace and trim with my satin trim paint. I took an electric sander and distressed the heck out of it. I found these great knobs in Shelley and was actually going to use them on my book shelf. When I held them up to it, I knew that they were perfect. We weren't sure if we were going to use this old piece or find something new, but after I painted it and put on the knobs I knew it was just right for this space. This dresser actually took me only a couple of hours, but it gave great impact to this room and I love it! Pin It
Thursday, January 8, 2015
My Ikea hack
So here I am again posting another fun thing from our bedroom. This is my first Ikea hack, and I am excited to share it. When we were first designing our room, we wanted some book shelves to go on either side of our fireplace.
I found these at Ikea. They were just standard bookshelves stained a cream color. I knew I needed to paint them since the white clashed so bad with the white in my room. So we went to work painting them....the first time. A beautiful shade of deep gray.
Notice, the gray is only on the insides. We did not use any primer or liquid sand the first time, and after we painted the paint just peeled off the surface. So we had to scrape everything off and start over. Not fun at all! For the second time around we decided to use zinsser primer...which I knew about....which I have used before...which I was stupid not to use the first time. Do not forget this step! It worked great.

When we took the bookcases into the room and put them next to the fireplace we decided that they didn't work there. We decided to screw them together like a hutch and place a piece of molding down the middle. I took off the original backs and installed some V board to give the inside a more custom look. I decided that since they were together and would be such a large piece in the room I wanted to paint them white and leave the inside gray.
The zinsser worked, the paint stuck the second time just fine, and I loved the way they looked in the room.
My husband added some lights the top inside, some glass shelves so the lights would shine through, and some crown molding on the top. We also found some fun knobs to go on the drawers. I am not going to lie, this was a lot of work, but way worth it. I love how it makes the room feel comfortable. I love to read, and having my books in my room makes me smile every time I look at it. Pin It
I found these at Ikea. They were just standard bookshelves stained a cream color. I knew I needed to paint them since the white clashed so bad with the white in my room. So we went to work painting them....the first time. A beautiful shade of deep gray.
Notice, the gray is only on the insides. We did not use any primer or liquid sand the first time, and after we painted the paint just peeled off the surface. So we had to scrape everything off and start over. Not fun at all! For the second time around we decided to use zinsser primer...which I knew about....which I have used before...which I was stupid not to use the first time. Do not forget this step! It worked great.
When we took the bookcases into the room and put them next to the fireplace we decided that they didn't work there. We decided to screw them together like a hutch and place a piece of molding down the middle. I took off the original backs and installed some V board to give the inside a more custom look. I decided that since they were together and would be such a large piece in the room I wanted to paint them white and leave the inside gray.
The zinsser worked, the paint stuck the second time just fine, and I loved the way they looked in the room.
My husband added some lights the top inside, some glass shelves so the lights would shine through, and some crown molding on the top. We also found some fun knobs to go on the drawers. I am not going to lie, this was a lot of work, but way worth it. I love how it makes the room feel comfortable. I love to read, and having my books in my room makes me smile every time I look at it. Pin It
Tuesday, January 6, 2015
Mixing some old with some new
December is over and January is a new month and a new year. December was a whirlwind for me this year, and although I got a lot done in my house, I didn't get a lot done on my blog. We have been working on our master bedroom the past couple of months. My older post showed my room painted, and the ceiling painted as well. I painted the room Silver sage from Restoration hardware. I love the color, so calming and relaxing. One of the fun new additions I put in the room was a new fireplace. It is a real flame fireplace. It burns a real fire using cans of gel. It is clean, odorless, and you don't have to vent it. We love it. Although it was beautiful and new, we wanted to add some character to the room. We had inherited a beautiful hand made piece of furniture from my husbands great grandfather. I knew that if we painted that and placed it on top of the fireplace it would be just the thing.
I went to work, It came already half painted, so I didn't feel bad about painting it white at all. I took a lot of time, and a lot of coats of paint, but it turned out beautiful.
Although the fireplace came white, it was a different shade of white so I painted that too. I used my favorite liquid sand product, then just painted it with my white trim paint so all the white matches the room. I love how the top makes the fireplace feel like it has been in the room forever. We got it put together, and I went to work decorating it.
We decided that instead of a mirror in the middle of it we would put this fun Paris subway art since Paris is one of our favorite places to visit. I think it gave it a fun and unexpected look.
I love the character and history of old houses, and I love that re purposing a piece of furniture added so much meaning and character in my "new" house. Pin It
Tuesday, June 17, 2014
Painting cabinets
I recently had the opportunity to teach a class about furniture and cabinet painting and re finishing. This was such a fun topic to talk about. Finding old and dis-guarded furniture and giving it new life is what I love doing most. My family jokes with me that besides my piano, no piece of furniture is safe around here. It is true. What better way to transform a room than to give the pieces in that room some new life. If you can do that for just a few bucks worth of paint....even better right. Here are some fun tips and tricks I have learned along the way through my own trial and error that I want to share.
First I am always asked how I prep the furniture that I am going to paint. Let's say I am doing a kitchen full of cabinets. With so many doors and drawers, sanding each one seems like a way daunting task. I have found a product that I use not only on my cabinets, but the furniture both wood, or already painted.
I first remove my cabinet doors and all of the hardware laying them on cardboard large pieces of cardboard. I love painting on cardboard because you don't get the goop on the sides of the doors you get when you lay them on plastic. Then I look at the cabinets and see if there are any spots that need actual sanding or if there are any holes to be filled with putty. After that is done I take a clean rag and wet it with the sander deglosser and go to work wiping them down. The great thing about this product is that it both cleans and sands your cabinets. Two steps in one. Next I prime the cabinets with Zinnser primer.

This is the primer I love using. They have many types of primer, but I this oil base primer works great. You can still paint water based paints over it. I brush on the primer, doing two coats, and sanding between each coat. After the cabinets are primed, I move onto paint. I always have just used regular satin finished wall paint from Lowes or Home Depot. I paint two coats, usually using a foam roller. This has always given me the desired finish that I am trying to achieve. When I am painting my cabinet doors, I always start painting the backs first, then when they dry, usually overnight, I flip them over to do the front. I do not install them back onto the cabinets until giving them a good 24 hours of drying time. I never fully shut my cabinet doors or drawers for a week after painting them. If you want to sand the edges for a more distressed finish, always wait at least a week before sanding them.
They said they drilled two small hooks on the back of the doors, painted one side, flipped them over, painted the other side and hung them to dry on hangers. http://www.thisoldhouse.com/toh/how-to/step/0,,20315665_20696254,00.html
When your cabinets are done, don't forget the hardware. Nothing transforms cabinets or a piece of furniture than the knobs. I love to take chunky knobs and spraying them a fun glossy color.
It adds such a pop of personality to the room. It is amazing how some work and some paint can give a room new fun life.
Pin It
Monday, April 7, 2014
It's bright and I love it!
I am so close to being finished with my game room. We have been working on it for a couple of weeks, adding paint, wainscoting, desks, game tables...you name it. Except for the trim and a few touches the room is finally done. Here is the before...dull and boring. Just a blank space.
Here it is now...bright and full of color!
I wanted big pops of color in this room so I added a lot of turquoise, reds, and bright greens. It is a game room, so we wanted to make it fun.
We have a place to watch TV, do homework, and have fun playing games.
I found this table at the DI for 25 bucks. We sanded the top and stained it a different color, and I painted the legs a nice gray. I had the stain and paint in the garage, so this table was literally a 25 buck purchase.
I am so excited how this room turned out. It was a lot of hard work, but defiantly worth doing. We added personality to the walls by adding the wainscoting, and paint. We re used the couch, rocker and settee. I found the ottoman at Down East Home, and painted an existing table I had bright green. I love re using what I have in my home to make the room affordable and give things I already have new life. Just by adding new pillows my couch had a completely different look to it. I love color and it was fun to just play with it in this room to make it a bright and fun place for the whole family to enjoy. Pin It
Friday, March 21, 2014
Easiest change in a room...painting furniture
We have been working on our game room these past few weeks. I have to say that my favorite part of any room is picking out and painting the color. I chose a soft yellow butter color for my walls, my furniture is red, and I needed to pick a third pop of color to really ground the room. I found this console well over a year ago at the DI for not much money at all. I knew I needed a place to put the TV on and this was just the piece I needed for the room.
This is a classic example of an old seventies piece of furniture that most people would walk by and ignore. Not me. I love to look at old pieces and re imagine them. The knobs were broken, the stain was chipped, but I knew that with a little color this piece would be fabulous!
We decided to pick a bright turquoise for the paint color and I went to work painting it.
As usual I started with wiping it down with my liquid sand product, then I just used a satin turquoise wall paint. It took two coats to cover. I let it dry and distressed it a little.
It seriously didn't look like the same piece anymore. I added some fun knobs to give it a little character. I actually used outdoor gate pulls for the drawer pulls and found these fun crystal knobs at Hobby Lobby. I love adding fun knobs to my projects. It adds a lot of personality. For not a lot of money and not too much work, I had a great piece of fun furniture for my room. It pays to really look at the things you may have and re think them in other ways. It may be just the thing your room needs to add a little wow to it. Pin It
Tuesday, August 27, 2013
The story of my console
Life has been so busy with the end of summer fun, school shopping, and school starting. I am finally happy that I have time to post on my most favorite topic. Re-finishing furniture. Now that my theater room is done, I have decided that the console I painted is one of my most favorite pieces I have done in a long time. This piece of furniture was such a lucky find. We knew that we wanted a built in unit for the television but didn't know if we were going to go totally built in or find a cool piece to go in the middle. We were walking around the DI one Saturday looking for white elephant gifts, and stumbled upon this piece of furniture.
The models were not included. :) This was your typical seventies piece of furniture. We seriously walked past it twice. We measured it, took a good look, and decided to bring it home with us. I love how well furniture of that era was built. This thing is solid! I decided at once that I would paint it white and spray those fun chunky knobs dark gray.
Once the room was primed and the shelves next to it were built, I went to work painting it. I always start my paint projects with this product.
Best product ever. It cleans and sands your furniture all at once. Just wet a rag with the product, wipe it on the furniture, and start painting. It totally bonds your paint to the furniture. Just a side note, this works on all woods, but if you are painting something like laminate you need to use zinsser primer first. I just painted with the same paint I paint my trim with and sprayed the knobs with rustoleum spray paint.
I am so glad that we had vision for this piece of furniture. When you paint old furniture you save so much money, and you have a one of a kind piece that no one else has. Pin It
Monday, August 12, 2013
Covering that color!
We bought this house with the intent of remodeling everything. Some rooms in the house are better than others. There are defiantly two that tied for the worst. The girl's bathroom, and our theater room. We decided that the first level we are finishing is the basement, and the theater room is on that level. Here is the beautiful before...the day we moved in picture of this lovely room.
The picture seriously isn't doing the room justice. The color is so dark, and the only lighting in the whole room are those sconces. It is a long dark dungeon.
We put can lighting in the ceiling, and went to town priming and repairing those walls.
I can't believe how much brighter the room is! We decided to keep the room as a theater room instead of a traditional family room. The room is long and narrow, and we decided to put the TV on the far wall. My hubby built the shelves to store equipment, and we found the console for an amazing price at the DI. Can't wait to show off my painting project for that fun piece of furniture. So far the room is a lot brighter, and really coming together nicely! Pin It
Monday, July 1, 2013
Re purposing furniture
Here is a picture of the piece in her room all painted girly. It actually started out black, and I seriously just used paper towels to rub the paint on and off to give it an instant distressed look. It was about the fastest piece of furniture I have ever painted. She was a baby, it was nap time, and I got it done! Whiled I loved it, I knew it would never work this way in my craft room.
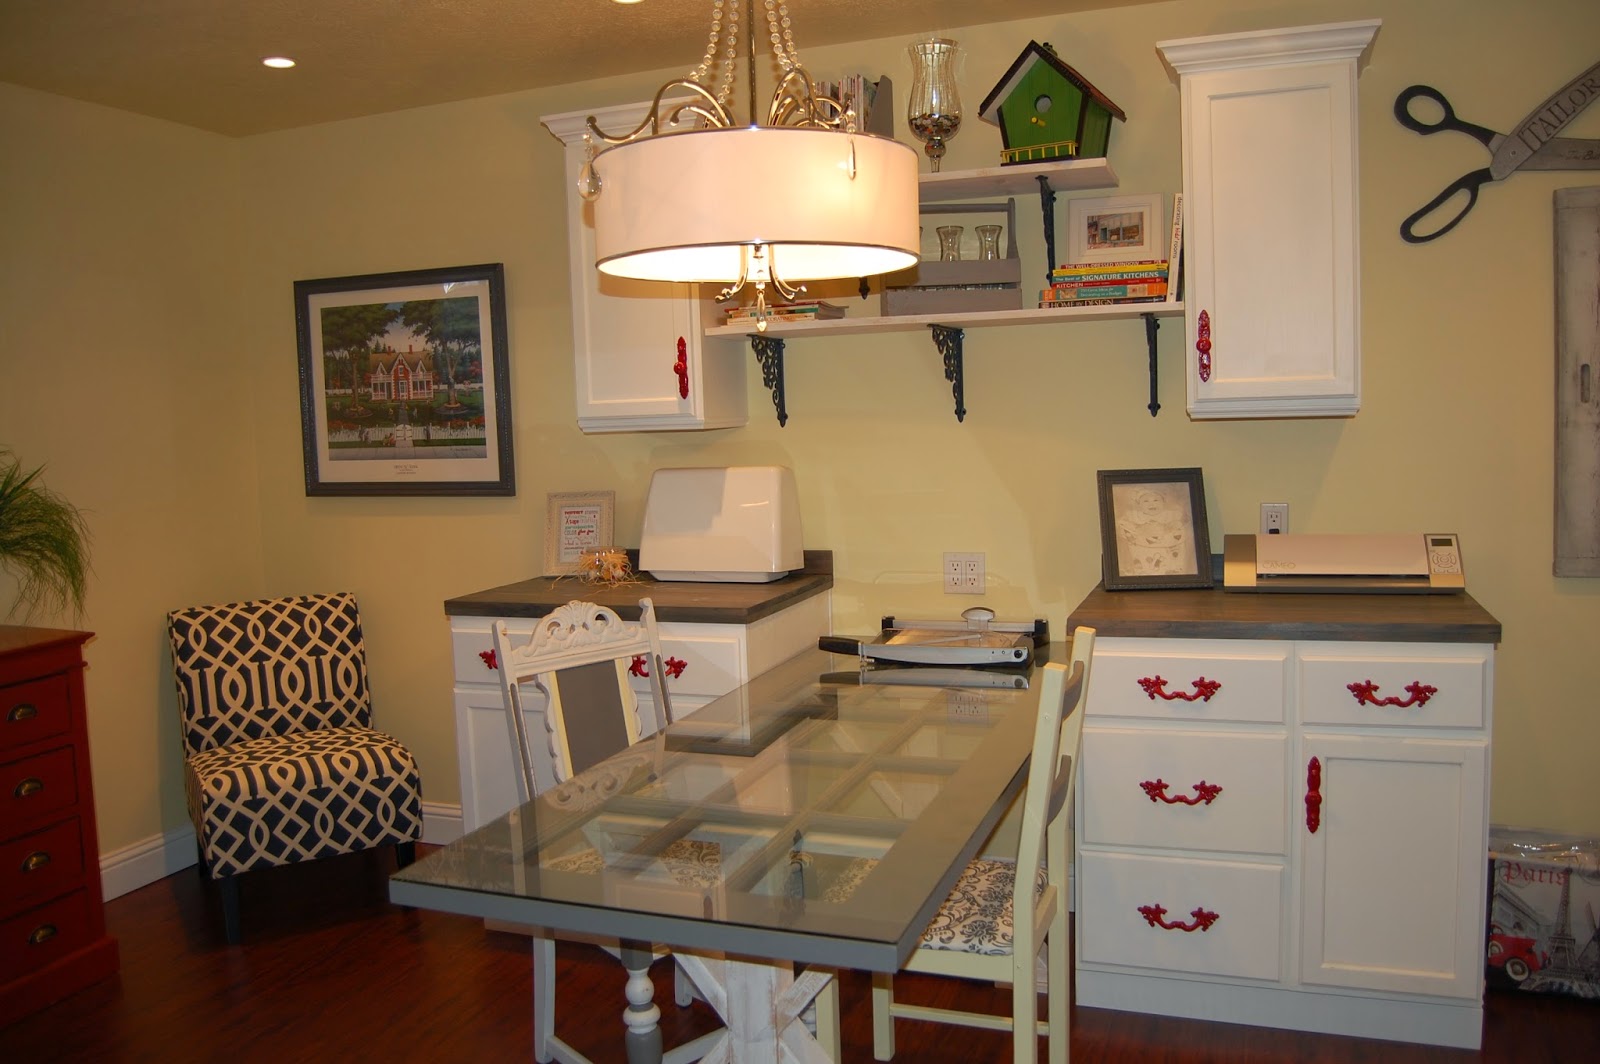
I decided to paint it all a charcoal gray color. I used some wall paint from another room in my house, a foam roller, and went to work. I was going to paint a design in the center section, but I liked the way it looked just gray all over. I found some fun knobs at Hobby Lobby and sprayed them white to add more character. I love the way it turned out, and I am so excited for the storage it will give me.
While I was painting that, I realized I needed some chairs for that room to go with the table. I had some old wooden chairs I had used in other rooms in my home, and decided to change them up a bit.
I had one of these chairs in storage that I used in my other daughter's room when she was little. Again, it was pretty pink and girly. I also had an old ikea chair I had painted from the craft room in my other home.
I went to work painting all the wood that was going to show. I painted this chair's back the same butter and gray I used on the walls and the armoire.
I took the girly chair and painted some gray and yellow details on it. I found some fabric I loved for the seat, stapled it on, and I had two great chairs to sit on while I did projects.
Thursday, June 27, 2013
My French Door Table
When I started this craft room process, I wanted a table coming out into the center of the room. A lot like a kitchen island. I wanted to be able to use my sewing machine and have room to pull fabric through, kid's school projects that seem to always use poster board, and just have a space where more than one person could be sitting comfortably doing a project together. We looked into doing cabinets that resembled a kitchen island, or buying a table to go in the center. Both were pretty expensive, and kind of generic to me. We came up with the idea to use a French door as the top and have my hubby make the legs.
First we bought a wooden french door from our local hardware store. It was unfinished, and it also came without the knob hole cut out. Very important to me... I didn't want a hole in the middle of my table. I decided to paint the door a charcoal gray. I used left over satin wall paint I had from another project. Painted two coats on it, then distressed it to look old.
The design of these legs were inspired by a picture I saw in a magazine of someone's dining room table. I showed my hubby the picture and away he went. It was fairly simple. We went to Home Depot and got some wood and assembled two unique table legs using just this wood and some nails. After he got them built, I went to work painting them. I wanted them to look rustic and distressed, so I literally white washed them using a dry brushing technique. They were dry almost instantly, and took about a half hour to do both. The fun part of dry brushing, is not a lot of paint goes on at first so there is a lot of room to mess around with the finish to get your desired look.
Here is what it looks like put together. I haven't painted the legs in this picture, but after the legs were painted, we screwed on the top to the legs, got a piece of glass cut to cover the top of the window for the table top, and I had a one of a kind craft table.
I love working on my table. The kids also love the table, and having it come out into the room is just perfect for us. Best of all the table is one of a kind, I had fun creating it, and we saved a lot of money just making it ourselves. Pin It
Friday, April 27, 2012
New Life for some Old Furniture
Taking the old, making it new...so fun, cheap, and cheerful. I love re purposing all my old furniture when doing a new room. My older daughter had a desk we used in her old room. We took that desk, re-painted it, and it totally changed it's personality and looks brand new.
Here's how it looked before. It went in her room in our old house that looked like this.
I re-painted it to match the new room, and now it looks like this...
In her room that looks like this!
We also re purposed an old mirror that was a top of a dresser and made it into a one of a kind head board.
We took out the center mirror, painted it the hot pink color of course, picked out some fun fabric, and then upholstered and tufted it with diamond buttons. We took some wood, put batting on top and stapled the fabric to it. We then marked the back of the wood where we wanted the buttons, drilled some holes in the wood and took strong thread and sewed the buttons on. I think the whole thing cost about $50 bucks.
Do you see the bench on the end of this bed? We took the bench, re painted it, and re upholstered the top with black fabric and ended up with a fun seat in my daughter's room.
She has a great bench, for very little money. I love taking something old and making it new and fresh again!
Pin It
Subscribe to:
Posts (Atom)