Showing posts with label demo. Show all posts

Tuesday, June 16, 2015

Floor D.E.M.O

Finally! After four years we are tearing up the main level.  We have done this level in stages, so we have paint and molding done, now we can add the finishing touches and put in the floor.  I am excited because the kitchen is next. The cabinets are being built, and I can see the end.
  Here is the before the demo picture. The floors were wood, but too light and they didn't run through the whole level.  I wanted the same dark wood we used for the upstairs on the whole main level, so we had to tear up the old floor.

We were lucky. None of the wood was glued down so it came out pretty easily.  I think the whole floor took us about three to four hours to take it out.
 I love having my kids help.  I constantly tell them that these skills they are learning are skills they can take with them and always have to fall back on.  I also tell my boy how eligible this makes him with the ladies.  Who wouldn't want a man who knows how to build. :)
This is what he thought of that comment. Ha Ha


The floor is out, and already it looks better.  We have a lot of wood to lay down, but I think it is going to be awesome! Pin It

Monday, January 19, 2015

Some more demo

Yep it wouldn't be home around here without a little demo. Over the Christmas break we spent a day taking out part of a wall. It was a milestone for us...it was on the main level...the last level to finish. I did not think we would ever get to this point. So it has started and I am so very excited to show our little demo project...the start of my vision for the main living space.


I really hated how the walls closed in the stairs, and that I couldn't see the stairs from the front door. We decided to fix that by tearing out a section of the wall on both sides to open up the space to make it feel more open. It totally did the trick.  We are going to build columns on both sides and add some banisters to match what we have upstairs.  I am so excited to see how it comes together. Pin It

Tuesday, October 21, 2014

A little this and that

We are finished with the master bath project finally and have moved onto the master bedroom.  Last Saturday Jeff and I looked at each other and said we should paint the room...just go for it, just like that. It only took a couple of hours and we had ourselves a beautifully painted bedroom. I couldn't believe how quickly we got it done. I guess I was use to the bathroom project, long, messy, and labor intensive.  Not at all, this was quick, and fun, and exciting.
Here is the bedroom before paint.
Just a plain white room with this funky ceiling treatment.
We were originally thinking about putting up ceiling tiles on the ceiling, but decided that a little paint might do the trick.
We painted the walls the same blue gray color that is in the master bath.  I painted the wall color up the ceiling and chose a lighter gray color for inside of the trim.  This gives the ceiling an illusion of a trey ceiling. We took down the awful ceiling fan and replaced it with this fun orb chandelier I found in Boise over the summer.  Now I need to paint the trim, get a new bed, install the fireplace and bookshelves, add some finishing touches, and we are done! Pin It

Thursday, August 7, 2014

New master bath project


I am so so excited. I am moving on to the next project! We have officially started our master bathroom. Things are cleared out, colors are picked, and I am ready to get to work. Can't wait to show the progress! Pin It

Tuesday, June 17, 2014

Painting cabinets


I recently had the opportunity to teach a class about furniture and cabinet painting and re finishing. This was such a fun topic to talk about. Finding old and dis-guarded furniture and giving it new life is what I love doing most. My family jokes with me that besides my piano, no piece of furniture is safe around here. It is true.  What better way to transform a room than to give the pieces in that room some new life. If you can do that for just a few bucks worth of paint....even better right.  Here are some fun tips and tricks I have learned along the way through my own trial and error that I want to share.
First I am always asked how I prep the furniture that I am going to paint. Let's say I am doing a kitchen full of cabinets. With so many doors and drawers, sanding each one seems like a way daunting task. I have found a product that I use not only on my cabinets, but the furniture both wood, or already painted.
I first remove my cabinet doors and all of the hardware laying them on cardboard large pieces of cardboard. I love painting on cardboard because you don't get the goop on the sides of the doors you get when you lay them on plastic. Then I look at the cabinets and see if there are any spots that need actual sanding or if there are any holes to be filled with putty.  After that is done I take a clean rag and wet it with the sander deglosser and go to work wiping them down.  The great thing about this product is that it both cleans and sands your cabinets. Two steps in one. Next I prime the cabinets with Zinnser primer. 
http://www.320sycamoreblog.com/2012/01/how-to-paint-kitchen-cabinets.html


This is the primer I love using. They have many types of primer, but I this oil base primer works great. You can still paint water based paints over it. I brush on the primer, doing two coats, and sanding between each coat.  After the cabinets are primed, I move onto paint. I always have just used regular satin finished wall paint from Lowes or Home Depot. I paint two coats, usually using a foam roller. This has always given me the desired finish that I am trying to achieve. When I am painting my cabinet doors, I always start painting the backs first, then when they dry, usually overnight, I flip them over to do the front. I do not install them back onto the cabinets until giving them a good 24 hours of drying time. I never fully shut my cabinet doors or drawers for a week after painting them. If you want to sand the edges for a more distressed finish, always wait at least a week before sanding them. 
While looking for ideas on pinterest, I came across this inventive idea from This Old House. pro secrets for painting kitchen cabinets - like this hanging technique

They said they drilled two small hooks on the back of the doors, painted one side, flipped them over, painted the other side and hung them to dry on hangers. http://www.thisoldhouse.com/toh/how-to/step/0,,20315665_20696254,00.html
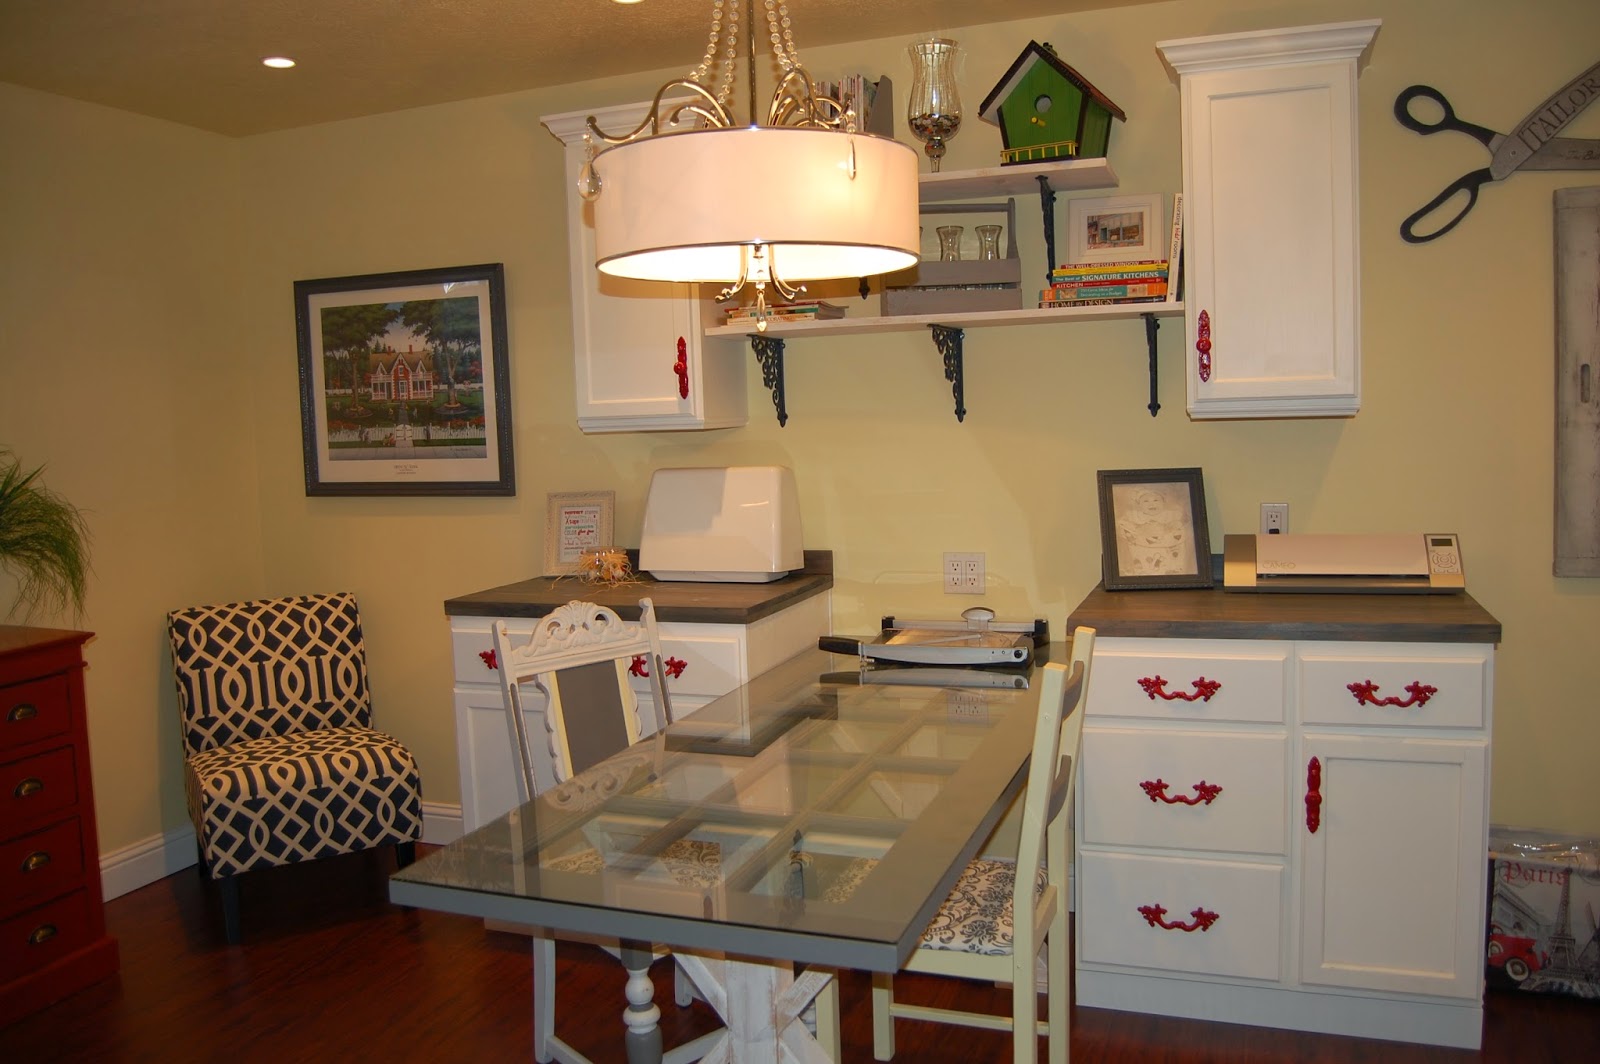
When your cabinets are done, don't forget the hardware. Nothing transforms cabinets or a piece of furniture than the knobs. I love to take chunky knobs and spraying them a fun glossy color.

It adds such a pop of personality to the room. It is amazing how some work and some paint can give a room new fun life.
Pin It

Thursday, March 20, 2014

Fun and games

It is starting to feel a little like spring around here, and sunshine and longer days always make me feel like a project. We have moved on to our game room. It is a large room above our garage that I want to make into a cozy, bright, and fun hang out for the kids.
Here is what it looked like before.
It had tons of potential, and I loved that angles on the walls.  The very first thing to go was that awful window air conditioner.
The next thing we did in this room was build this closet. The original closet was turned into our laundry room, so I needed somewhere to store games and toys.
Then we took down the fan and the awful ceiling treatment above it.  We took off the molding and re textured the ceiling and we can't even tell it was there. We actually purchased a texture gun for that.
Next big change for the room was giving it a new color and some wainscoting on the walls.  I chose my favorite shade of yellow.  It is a valspar signature color and is called butter. It is one of the most pleasing yellows I have found.
Then we went to work on the wainscoting to add some dimension and interest to the room. My hubby backed the walls with thin pieces of backer board, then measured and ripped MDF strips of wood to size on his table saw.  Just a white coat of paint, and it will be ready to go. Pin It

Tuesday, March 11, 2014

Holy Bathroom Batman

The hall bathroom. Seriously the worst room of my entire home. I don't know where to begin, from the dark brown tiles to the forest green paint on the walls...all of it is so horrible!  
The tile on the floor was uneven and you had to step up on the tile to get into the shower room.  So dark...and it was a bathroom for two girls. Not girly at all. 
Oh my gosh, when we got these walls painted, the room felt totally transformed.  We put the same black and white basket weave tile that we put in our basement bathroom and painted the walls a light gray blue color. 
The vanity is next. My oldest daughter wanted blue and yellow in the bathroom, and I loved the idea.  I am going to paint the vanity a pretty butter cream yellow and add some new knobs. We installed V board on the bottom portion of the walls to give the room a more airy feel.  It isn't done, but looks a lot better so far! Can't wait to show the rest of the room as it comes together. 
Pin It

Tuesday, September 17, 2013

My basement bathroom make over

I can't believe so many days have passed since I last posted. I haven't found a minute since the start of school to sit down and blog. Last year we decided to renovate and completely gut our basement.  The very first project we did down there was the bathroom.  This room seriously needed a face lift. It started out just your typical basement bathroom. Nothing fancy.
This is the before, right after we moved in.  It functioned fine, and served it's purpose but it just wasn't great to look at.  So we got to work gutting it out.  First we got rid of everything including the tub.
Yea, everything was out and we were ready to put things back together. I wanted to use a black and white checkered floor tile with white subway tile for the shower.  My son chose an apple green color for the walls and we installed V board and painted it white to break up the color.


I purchased a vanity from Lowes that I decided to paint a light gray color.  I got out the Prinzzer primer and painted a few coats, painted the gray color, then put new knobs on it, and it looked like a totally custom vanity.

Here is the finished product. Let me just tell you, small bathrooms are hard to photograph!


It was hard work, but I love how this space turned out! Pin It

Monday, August 12, 2013

Covering that color!

We bought this house with the intent of remodeling everything. Some rooms in the house are better than others. There are defiantly two that tied for the worst. The girl's bathroom, and our theater room. We decided that the first level we are finishing is the basement, and the theater room is on that level.  Here is the beautiful before...the day we moved in picture of this lovely room.
The picture seriously isn't doing the room justice. The color is so dark, and the only lighting in the whole room are those sconces. It is a long dark dungeon.
We put can lighting in the ceiling, and went to town priming and repairing those walls.
I can't believe how much brighter the room is! We decided to keep the room as a theater room instead of a traditional family room. The room is long and narrow, and we decided to put the TV on the far wall. My hubby built the shelves to store equipment, and we found the console for an amazing price at the DI.  Can't wait to show off my painting project for that fun piece of furniture. So far the room is a lot brighter, and really coming together nicely! Pin It

Thursday, June 20, 2013

A little bit of demo

There has been a little bit of demo going on around here. I  didn't like the floor plan in our basement. It felt like it was just a maze of rooms. We did not need one of the rooms by the stairs, so we decided to tear out the wall and make it one open space.  We didn't need a family room right there, we have a theater room in the basement already, so we decided that a great craft space would be awesome for our family.  Here is the floor plan and what it looked like before we took out the wall.
It was a small room and the hallway felt even smaller. So we took our hammers and ripped the wall apart. Of course being careful of all the wires and turning of the electricity first.
It was a family affair.
We took out all the wood and framing. There is just one supporting piece that has to stay. I think a column at the bottom of the stairs will solve that problem. It looks so much more spacious now. A great blank canvas for a fun craft room for the family. It opened the basement right up, and it became a relatively easy fix to our basement floor plan dilemma. Pin It